The latter half of this summer, in part because a return to in-person office work appeared to be fast approaching (since which time everything was delayed, again), and in other part because my previous pairs are both too small, I made three pairs of True Bias Lander Pants. Making so many in a row allowed me to compare fit and fabric so I thought I’d write it all down to help my future self with my eventual next pairs and maybe help others who have some of the same fitting challenges that I do.
These three pairs aren’t my first Lander Pants. You can see my first two pairs here. The original green pair are now shorts with the back darts reduced, a new, larger back waistband in another colour denim, and back pockets. The white pair, I love, but are also too tight in the waist and I’ve yet to unpick and replace as I did with the green ones. I should though because I do love them.
But this is story about a brown pair, a navy pair and a grey-ish pair:
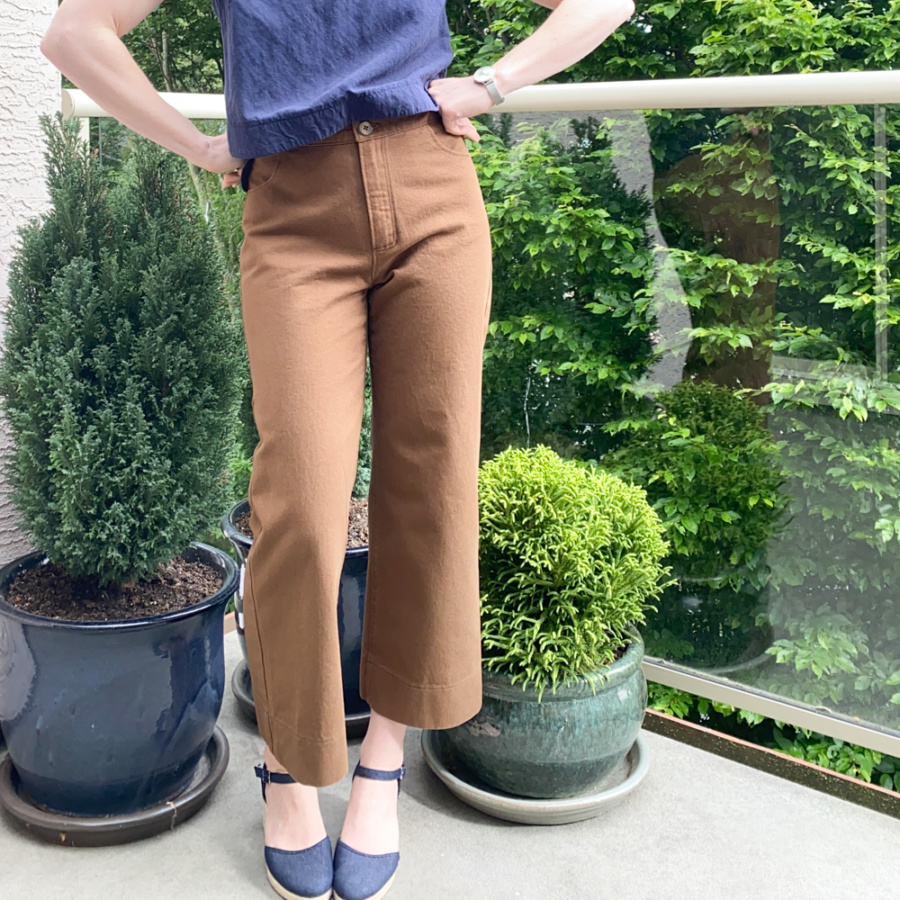
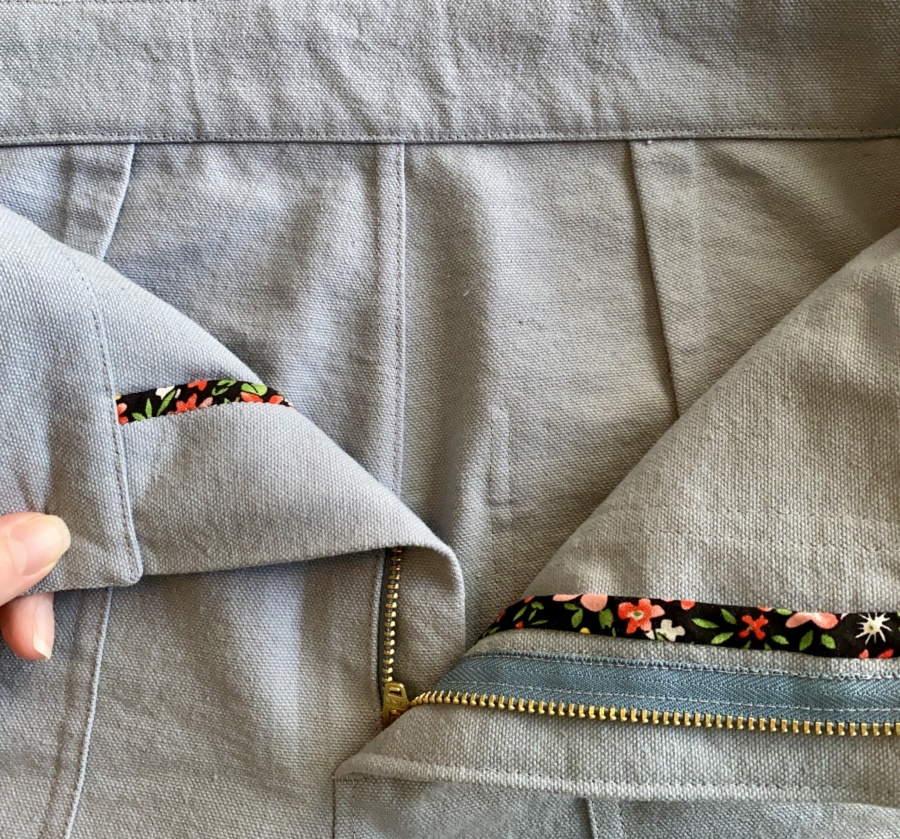
I threw all my previous fitting out the window for these pairs (because me now is a different shape than me then). For my first pair, I went with an unaltered size 4 (according to my measurements), with a Ginger Jeans zip fly (all version I’ve made have this fly construction because it’s just the best and I don’t like a button fly), Ginger Jeans pockets, and a Ginger Jeans curved waistband. I made them out of 9 oz. bull denim from Blackbird Fabrics in the colour “walnut”. And they ended up MUCH too large. I’m talking inches not millimetres. Actually, the back fit great and the side seams were right where they should be but the front was HUGE.
I went back and looked at the pattern and realized, for the first time, that the width of the front piece of this pattern at the waist is actually significantly wider than the back. They are built for more room at the front intentionally, which makes sense, but it was too much for me (and oddly bigger than indicated by the finished garment measurements). Unfortunately I’d already put on the pockets so I had to take the side seams in at the waist equally from the front and back, resulting in the side seam moving toward the back, but still leaving them bigger than I wanted to in order to preserve the pocket opening. These photos are taken in that state, before they were really worn.

Fast forward the first real wearing and they went from fitting pretty well when I got dressed, to falling down below my belly button in less than an hour (which is not their intended perch), but they also still somehow pinched my back waist. The bull denim is so soft and lovely but stretches out with every wear. That, combined with having left them a bit larger than I wanted through the waist and hips, meant they just didn’t fit well. I was disappointed but tired of messing with them and I moved on to version two.
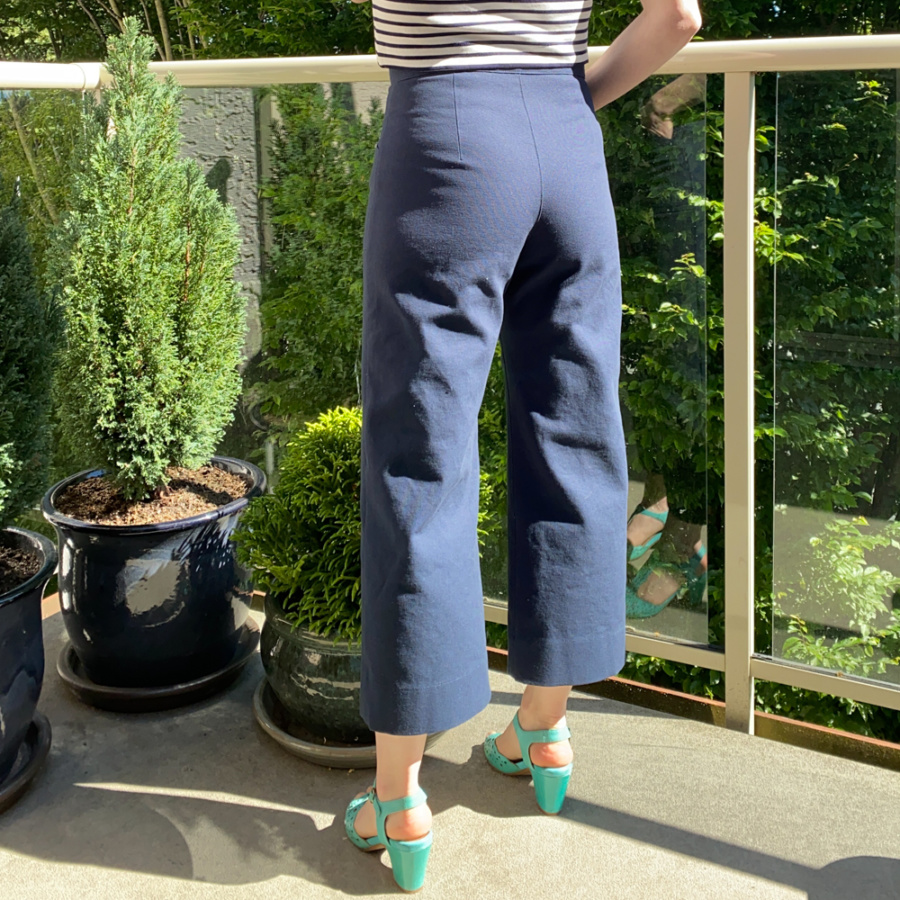
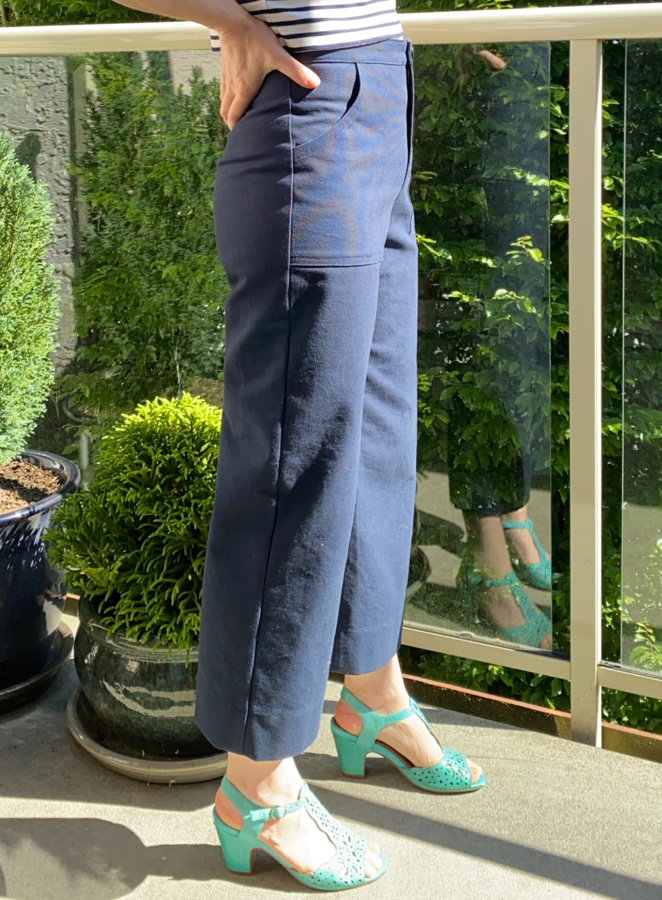
For this pair, I switched to my new favourite fabric for this pattern – 10 oz. cotton duck canvas (also from Blackbird Fabrics). This stuff does not stretch out with wear so preservers the fit though the day. It’s also quite crisp with a stiff drape, which I think works for this style of pants. I decided to go with the Lander Pants front pockets this time but did not line them, just finished the top edge with bias binding to reduce bulk. I kept the Ginger Jeans curved waistband (to start with) and the zip fly but I altered the pattern to reduce what I needed at the from the side seam at the waist of the front leg piece, tapering to nothing at the low hip.

This pair fit great at my pre-waistband try on so I was excited to finish them up. But when I added the waistband, they ended up WAY too tight. Not at the front, but at the back waist and sides. I paused for a moment then a light went on in my head. They fit perfectly before the waistband. I am very short waisted so they are coming up just above my natural waist when the waistband is added. My body is not angling inward anymore above my natural waist, it’s either remaining straight or going back outward toward my ribs… so why was I using a curved waistband?
And that’s when I realized why the Lander Pants come with a straight waistband. Somewhere, probably when I was still buying jeans that gapped open at my low back, I learned that pants HAD to have a curved waistband or they weren’t good pants. I carried this understanding into my making… but they don’t. Not always. Not in this case. Not were the body is angling back outward at the top of the waistband. I’m so short waisted that the top of the waistband of these pants is at my ribs (seriously, I’m so squashed between my ribs and hip bones that they’re almost touching). I luckily had enough fabric to recut a straight waistband and the difference when I attached it was incredible. Instead of the upper waistband digging into my body, the lower part of the waistband held the pants in the place and the upper part left me (and my ribs) free to move. It was a revelation. I love these pants for that alone.
Which means of course that I had to go back to the brown ones. I recut a straight waistband, took out the zip fly, brought them in at the centre front by about a quarter inch on each side, reattached everything… and now they fit. Well, they fit better. The waistband fits well but the rest of the pants still stretch out with wear and become baggy in the butt. At least now they stay up at my waist where they’re supposed to.
Now let’s talk about pooling and pulling.
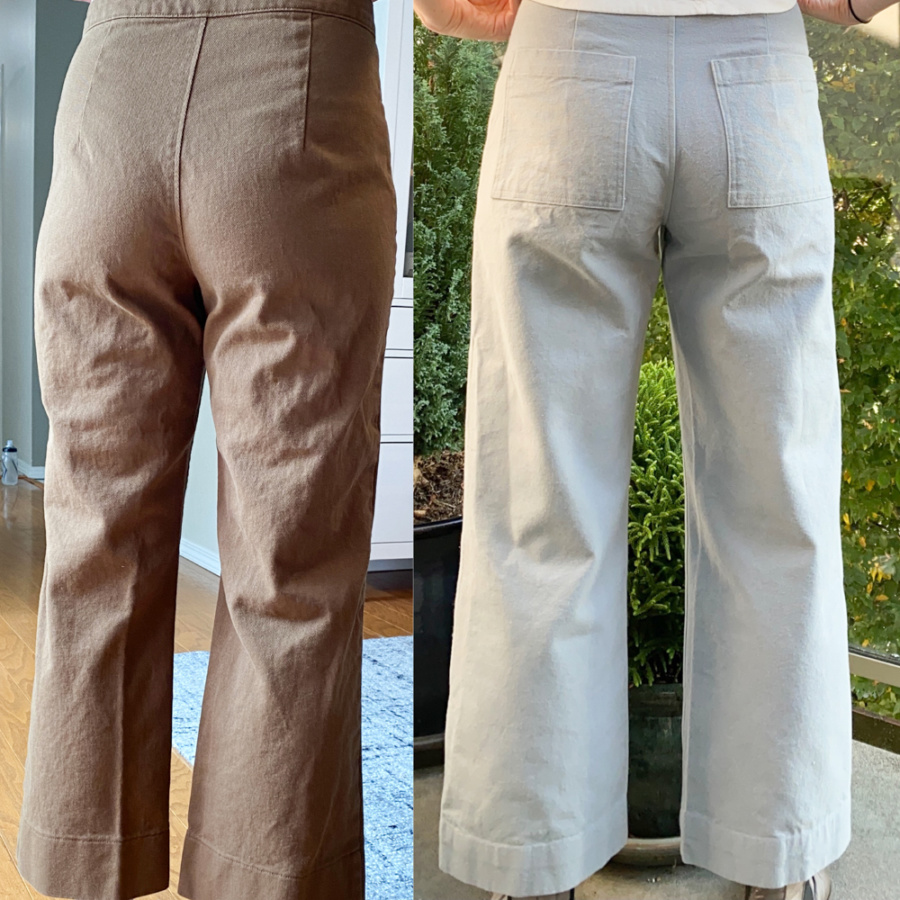
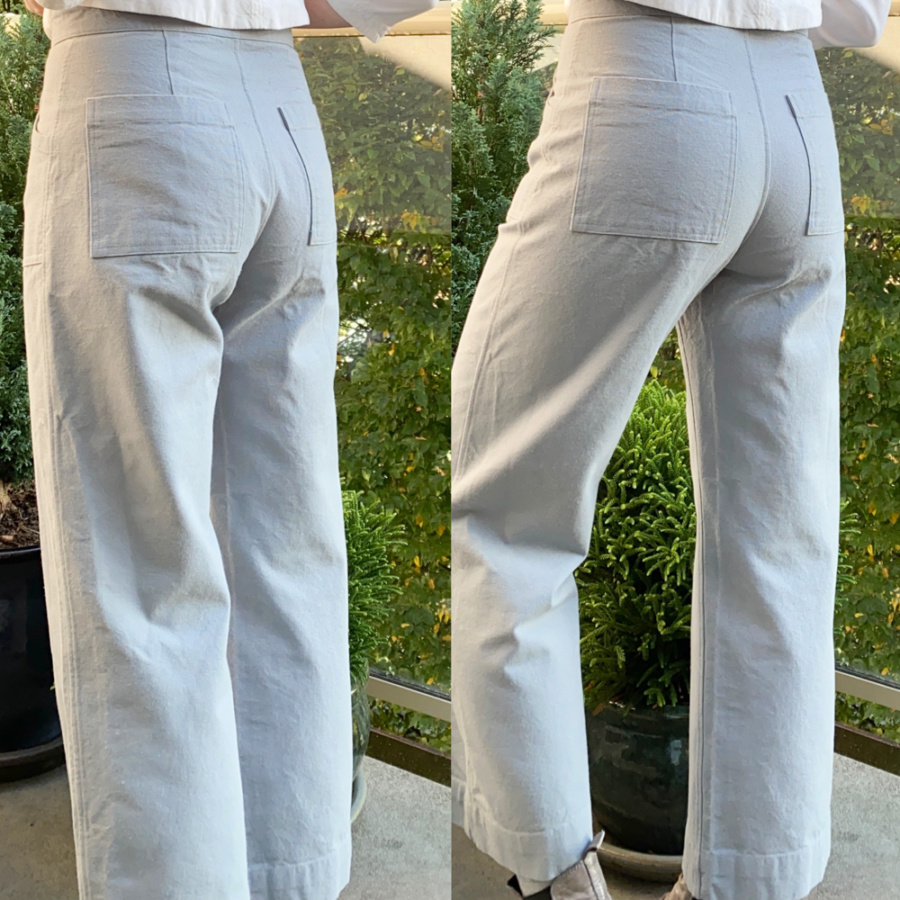
The photo below is a back view comparison between my first and third pairs. I haven’t talked about the third pair yet but they were a copy of my learnings from the second pair: straight waistband, zip fly, 10 oz. cotton duck canvas (this time from Spool of Thread and not as good quality as the navy from Blackbird – more on that at the end). In the photo below, you can see the way the fabric pulls and pools under my butt and behind my knees when I stand naturally. More in the first pair than the third because I added about a half inch to the front crotch hook after the first pair. This alteration helped a bit but not entirely and I’ve decided I’m fine with that, because my body is not a straight line and I stand kind of oddly.
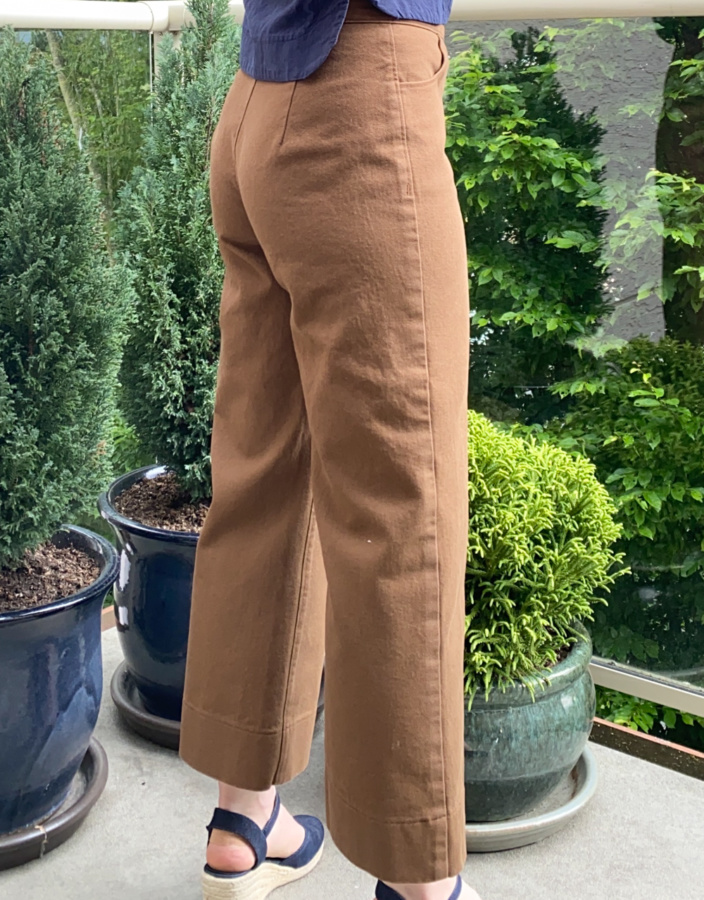
I stand with my hips pushed forward – like I’m leaning against a wind that only goes up to my waist. You can see it in the side view photo of the navy blue pair above and the grey pair below. I look like I’m being pushed from behind and my hips are over my toes. If I stand unnaturally (for me) with my hips pushed backward, these crotch pulls and rear pooling virtually disappear (see comparison below). I’m not going to change how I stand to fit my pants, but it’s interesting to note because I haven’t found posture mentioned anywhere in the multiple pants fitting resources and blogs I’ve perused. What if the way I stand just makes all pants fit me kind of weirdly?
The other place you can see pooling in all of these photos is behind the knee. I have prominent thighs and calves. My legs are ‘S’ shapes when viewed from the side but even if I do a full calf adjustment, I get this pooling and I think it’s again because of how I stand, with my hips pushed forward. The fabric has to get from my waist, back to my calves and it’s a journey. It has a hill to get over by the time it gets to my calves. Of course it’s not going to look flat and smooth. And that’s fine. They still do the job of being pants!
Along with the behind knee and under bum pooling, another fit issue I have on all pants, always, is excess fabric over the hip flexor/groin area that creates folds at the front, particularly when I bend my knee but you can also see it when I stand normally. I’d like to fix this but I also don’t know how to because of the way my body is shaped. I have a prominent pubis and prominent thigh but the area between them is flat. I have an indent right at that spot.
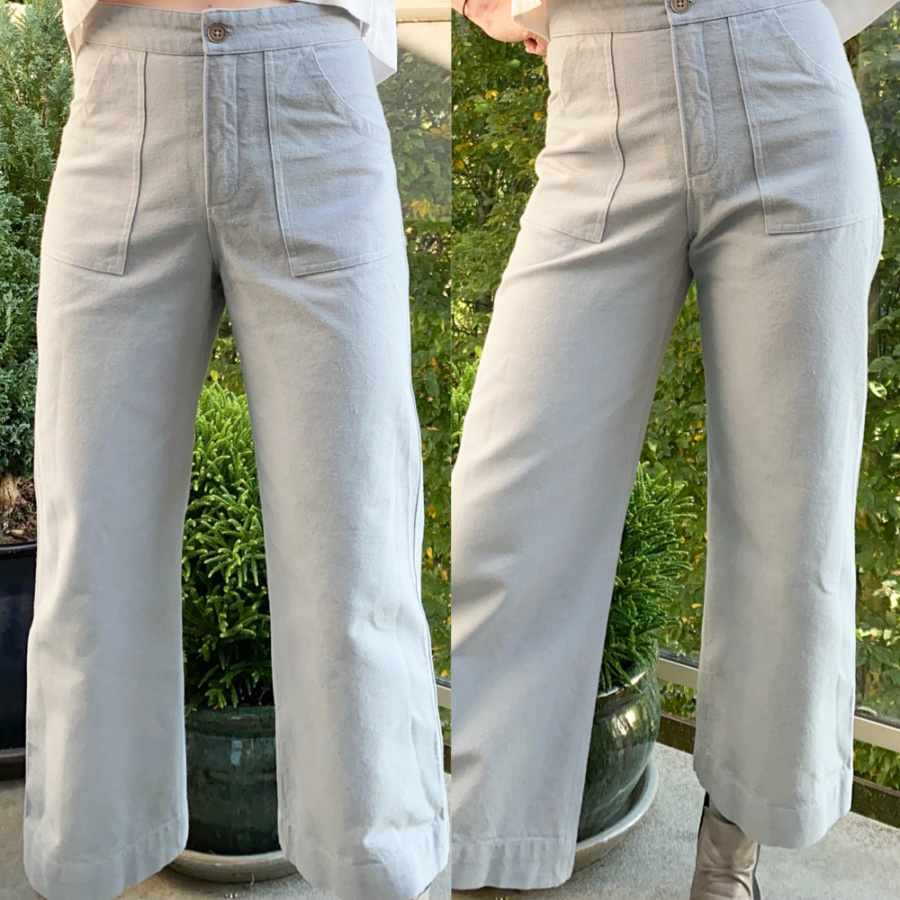
You can see the prominent thigh in the photo below. There’s a natural divot above it. So I live with it. It’s far less noticeable on tight fitting pants, like Ginger Jeans. I also think maybe the Lander pockets and the duck canvas accentuate it because the stiff fabric and extra layers don’t conform to the body as well… maybe I need to try a duck canvas pair with the Ginger Jeans pockets to find out. But not right now. I have enough pairs for now.
I don’t intend this post to seem like a lot of complaining about my body. My body is how it is. I mostly get along with it (aside from the chronic pain) and I’m just aiming for the best fitting pants I can put on it. These all turned out well. There’s nothing so wrong with them that I can’t wear them and I have worn them on repeat since I made them. They’re comfortable and worked perfectly with cropped t-shirts as my post-heat dome summer uniform. The navy duck canvas ones have been my summer fancy pants and will work well for the eventual return to the office with navy knee-high socks and oxfords.
I need to dye the third pair though. I wanted grey and that’s what this duck canvas from Spool of Thread was called (and how it looked online). In person though, it’s much more blue than grey and far lighter than I wanted. It also washed horribly and has white lines spidering through it where the dye absconded with the wash water on their first washing. I think I’m going to try to over dye them darker grey and make them more fall/winter appropriate. Wish me luck!
Thanks for sharing your time with me on this second-in-a-row very long post. If you have any thoughts or just want to commiserate about pants fitting, please feel free to comment below :)
~ Lindsay
October 6, 2021 at 6:40 pm
Thanks for this informative post. I love reading long detailed posts about fitting because they are so helpful and make me feel like I am not alone in my frustrations! I think that a bit of draglines is normal as the body moves and the fabric must move with it, but I also feel like I am chasing the perfect fit for my body and it is super satisfying to figure out how to achieve this. For the record, I think your pants look great. I am at the muslin stage of making a pair of Landers and am debating the straight vs curved waistband. I had been planning to use my Dawn jeans waistband on the Landers but after reading about your sewing experience, I am hesitating. Funnily enough, I am planning on using a Blackbird duck canvas fabric for the pants. Have you found that your straight waistband in duck canvas has relaxed a bit with wear? It is tough to know how snug to fit the pants when you don’t know how the fabric will react. Thanks again for all your sewing insights!
October 7, 2021 at 10:28 pm
Hi Emilie. I find the duck canvas relaxes a little bit with wear. I intentionally didn’t make my waistband super tight so they’ve been quite comfortable. I’m glad you found my post useful and best of luck with your Landers too!
November 2, 2021 at 10:51 am
Starting in on my first pair of Landers and I’m so glad I found your post! I have the same issue with all pants, always excess fabric around the groin. If you ever find a magic pattern or alteration that fixes this please share! I’ve been doing some research but it seems like a black hole of fit issues and I don’t think I’m ready to take that on quite yet. :) For now, I’ll live with it and start in on my first pair of landers this weekend!
November 8, 2021 at 6:18 pm
This is a great post. LIke you, I found the Landers pants to be ridiculously large when I chose the “right” size for my measurements. I took in the sides so much that the pockets were no longer usable, and all kinds of distortions were introduced that I really don’t like at all. And yet it seems like such a straightforward pattern! Your post has encouraged me to do further experimentation, probably basting the side seams and waiting until I have a good fit before applying the pockets. Also: completely agree that the fly front is a big improvement over a button fly without a true fly–it’s too flimsy.
November 30, 2021 at 8:08 am
Hi Tracy – glad to hear you will give them another try! I always wait until the end to apply my pockets. Even after doing it so many times. They just always seem to end up in the wrong place if I follow the pattern directions!
November 30, 2021 at 8:10 am
Hi Kate. If I find anything, I’ll post it here for sure. The only thing that helps that I’ve found this far is making tighter fitting pants with stretch material… which doesn’t really help this patter unfortunately.