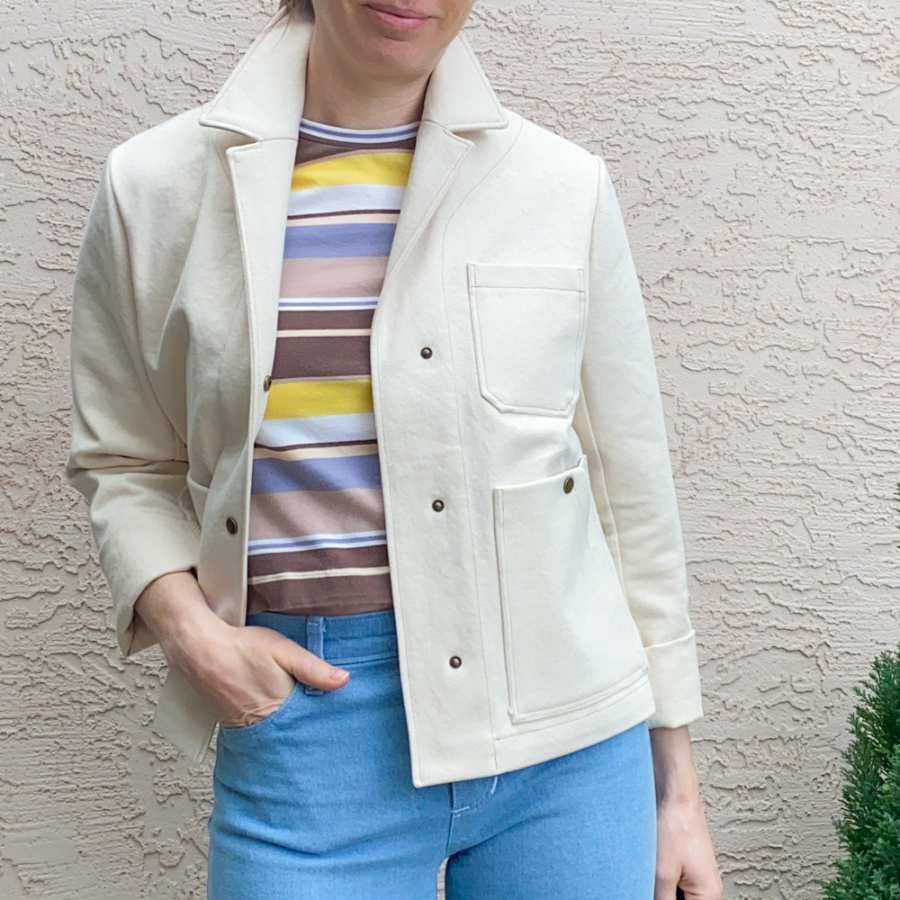
I’ve been toying with the idea of making a light coloured cropped denim jacket for a few years. I wanted a little more modern style than a traditional jean jacket. It was the back button placket on the Sienna Maker Jacket from Closet Core Patterns that sold me. I saw a few versions on Instagram that really gave me pause and decided I could tackle the fit mods that I’d need to make it my own.

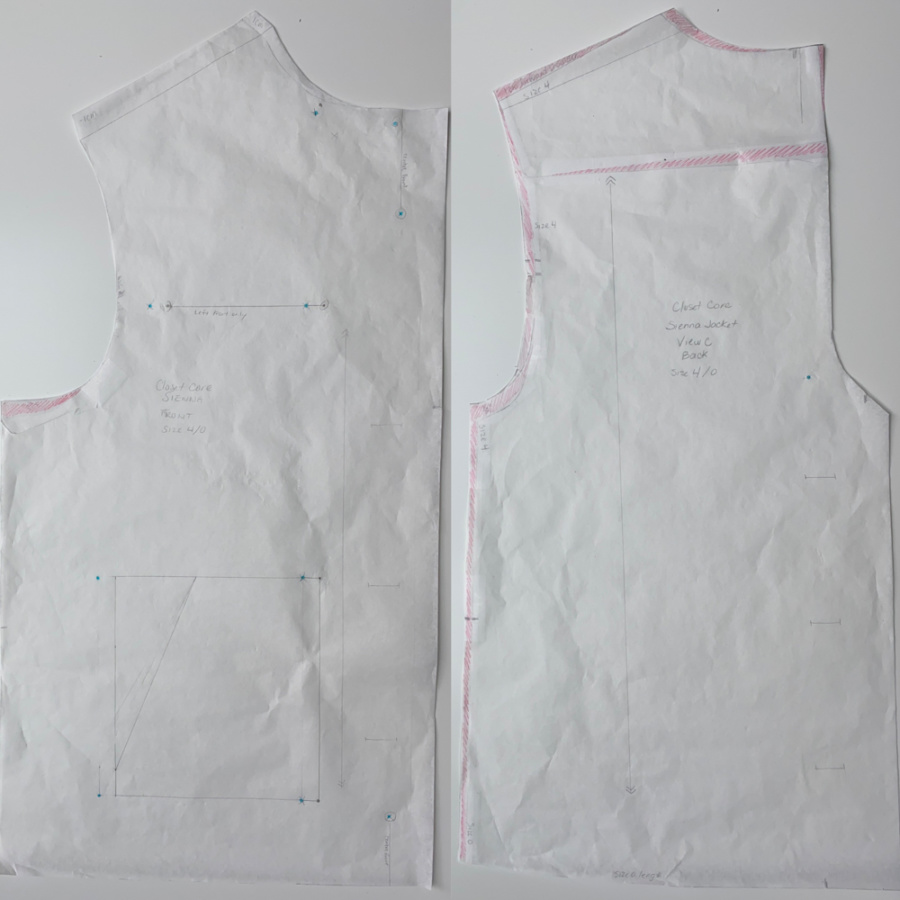
The cropped version of this jacket has a flared, almost swing fit and slightly dropped shoulders. I wanted a straight silhouette (because I’ve got very narrow hips) and more fitted shoulders so the first thing I did was size down two sizes from my measurements (I measure at at 8 and started with a 4). From there I made some more mods, made a toile, then modified further. Here’s what I ended up doing (for reference. I measure 35/29/36 currently):
- Sized down to size 4 and tapered the side seams to size 0 at the hem
- Sized down to size 0 sleeves but kept the size 4 height in the sleeve head
- Added a bit of width to the back (shown in red in the photo below)
- Moved up the arm holes by 1/2″ on the front and back and on the bottom sleeve piece
- 1 cm forward shoulder at the shoulder edge only
- 1.2 cm round back adjustment
- Shaved off about a half inch from the front armscye curve
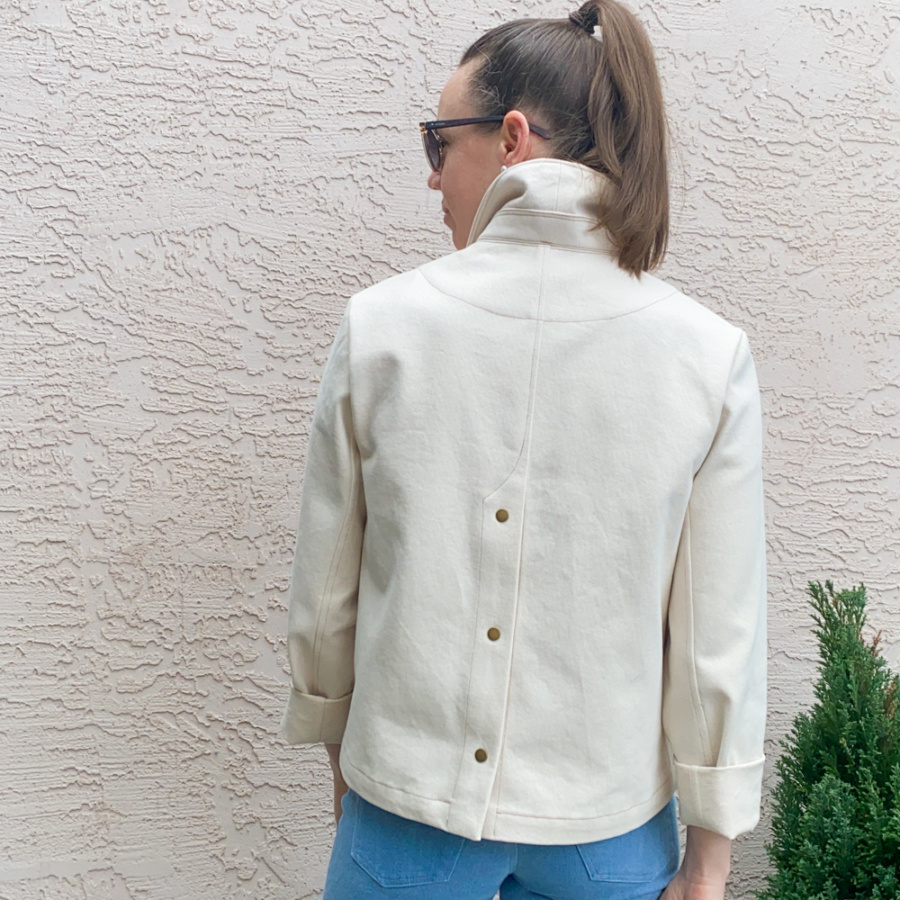
- Added a sewn on collar stand to reinforce the back collar and help it stand up
- Interfaced both the upper and under collar pieces
- Cut the front pieces and front facings straight to eliminate the large lapels
- Reduced the width of the front and back facings by about an inch; and finally
- Designed my own front pockets
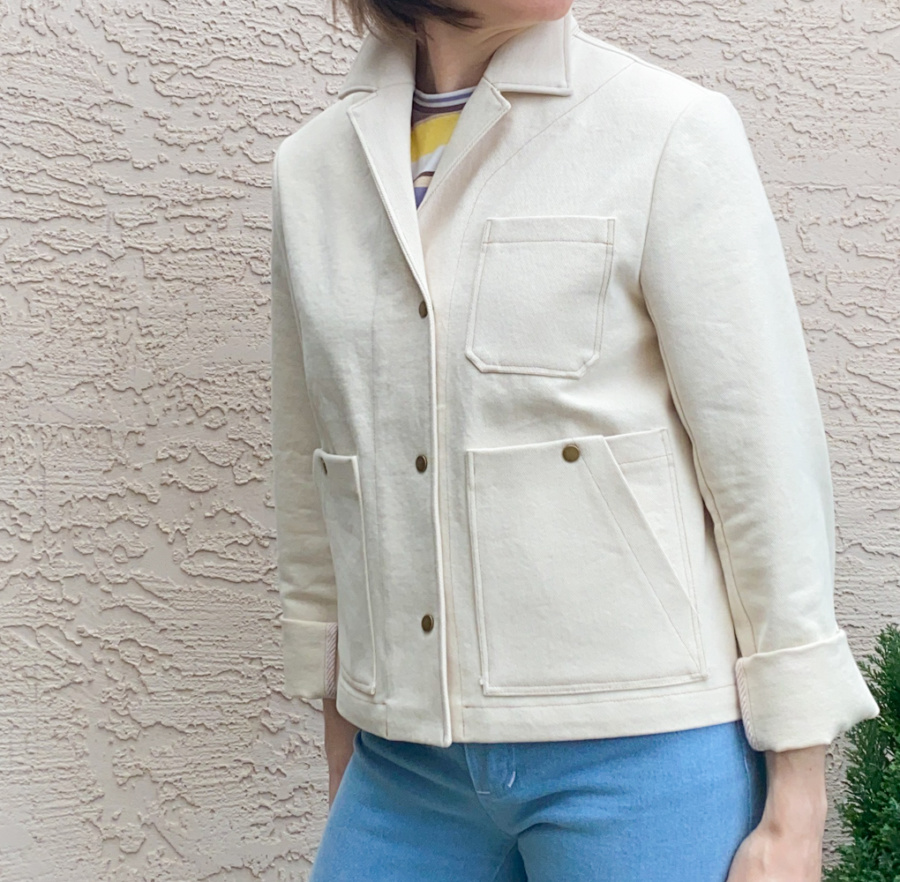
This jacket feels so dang cool. Cooler than me. Stylish in a way that I am not. I feel a bit like an imposter wearing it. Like a cool kid who found a funky mens jacket in a thrift store, cut off the bottom, rolled up the sleeves, and popped the collar. I will always pop the collar. That’s why I interfaced it so heavily and added a faux collar stand to the under collar to give it more strength.

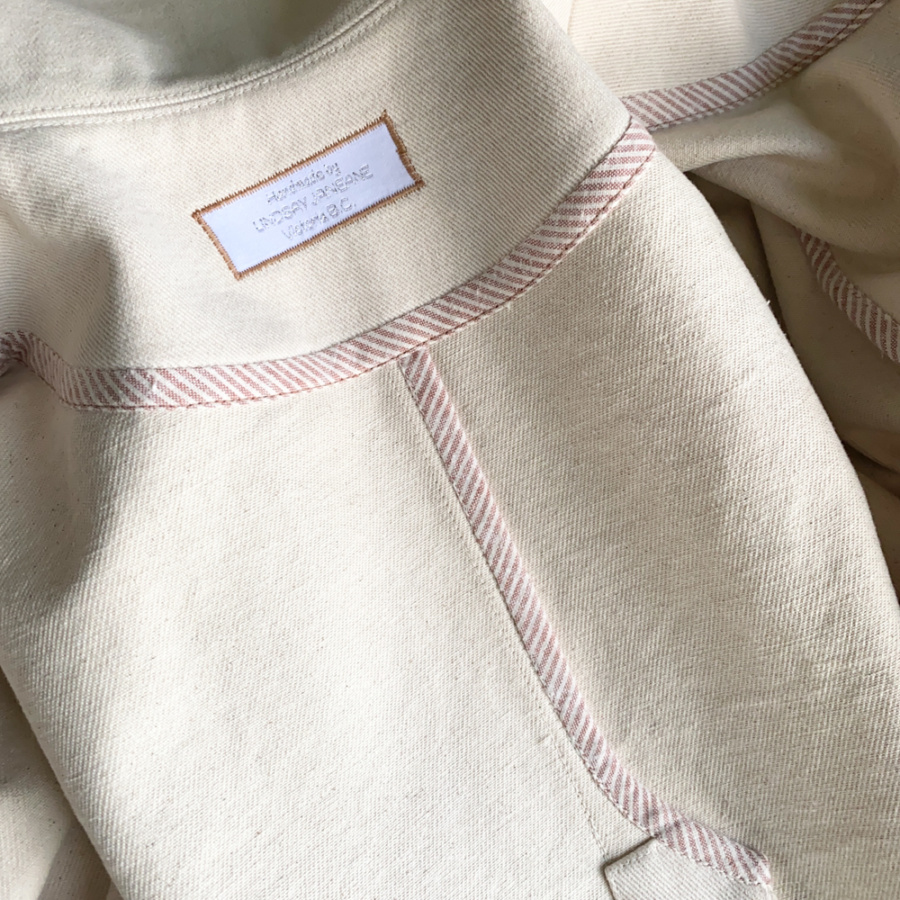
My top stitching isn’t the neatest. I thought I bought 9 oz. Bull Denim from Blackbird Fabrics but it ended up being 12 oz. It’s very heavy. Structured. Thick. It has a beautiful soft hand though and I love how it ended up working for this pattern. My machine struggled in places though and the stitching isn’t as clean as I’d like. You can’t tell unless you get up real close and no one but me is going to do that so I’m not letting trying not to let it bug me. The insides make up for it. They’re so clean and beautiful. The scrap fabric I used for bias binding is from my Archer shirt experiments and looks like candy canes. I bound the back seam, the facings, the inner sleeve seam and the arm holes. I love how it turned out so much. Candy. Just for me.

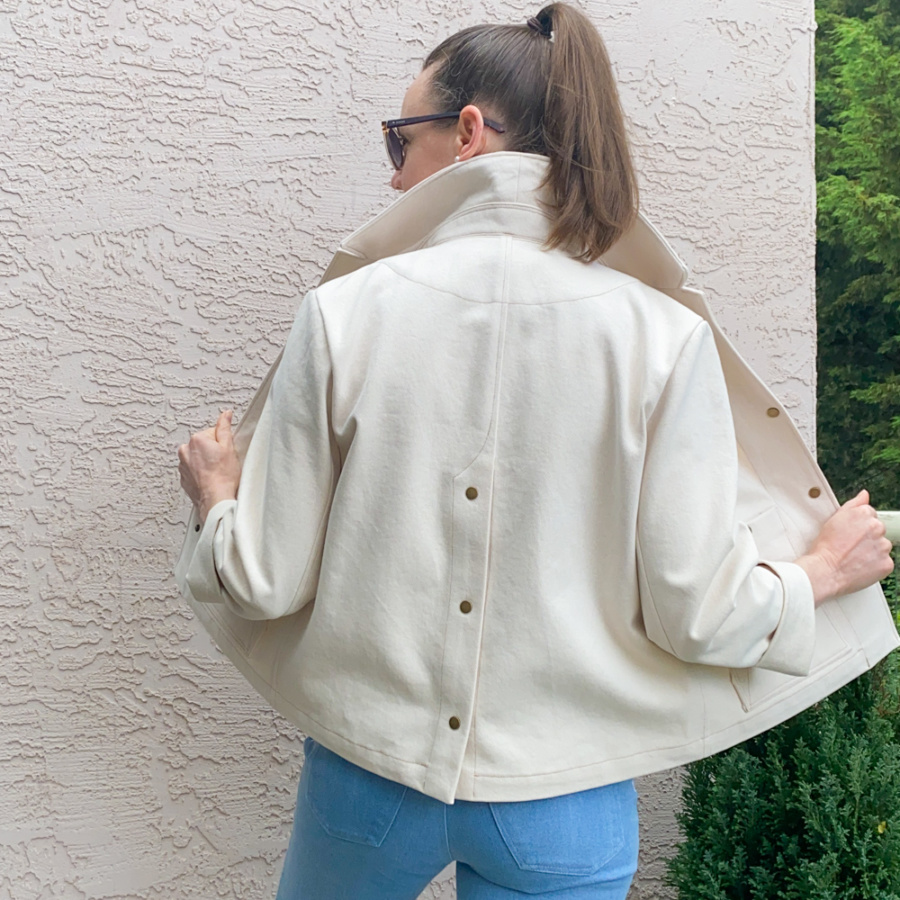
I didn’t nail the fit. I had restriction moving my arms forward on my toile so I adjusted the front armscye curve inward by a good half inch but this still feels and looks tight across my front shoulders. I probably should have adjusted the length of the shoulder seam as well to bring the sleeve seam up on my shoulder more. Even with the weight of the pockets, it still likes to slide back off my shoulders a bit. I could have brought the shoulders forward more, rotated the sleeve a bit and brought up the back neck up another 2-3cm. Regardless, I love it. I’m going to wear it all spring/summer/fall. It’s nice to finally have a short, light coloured jacket to wear with jeans.

Now, about those pockets. I had fun with them. They’re 100% from my brain and I love them. Are the practical? Not really. This thick denim made them trickier than I’d hoped and the snap buttons were difficult to attach (one popped off already and had to be replaced). I also understand now why two layer pocket are usually constructed with your hand in the back layer, where the top of the pocket is fully supported with a seam. I made these with my hand in the front layer, so there is no fully supported back seam and they pull a bit. Deal breaker? I don’t think so. They look really neat, and my cell phone and hand fit, which is all that’s required of a pocket these days, isn’t it?

These are the two pocket pieces, for anyone who is interested. The little notches cut out everywhere are to reduce the bulk. I removed the seam allowance from the two fully enclosed side of the inner layer as well. I interfaced the angled opening so it wouldn’t stretch as much over time but did not interface the top fold of the inner layer. The height is enough to fit my cell phone in the inner pocket and still close the snap, just barely. Construction order was challenging. I used a test version to figure it out. The outer pocket flap had to be sewn first and then the two top flaps serged together and opened up so only the flap of the inner layer could be sewn down next. If you try it, I highly recommend a practice version first to sort out the order.


The weight of this jacket makes it feel like armour. It’s cool and heavy when I put it on. It’s buttery soft to the touch though and feels quite special. As soon as I finished it, I began longing for a pair of brown high waisted, wide leg pants. I think a reprise of my Langers is in order. And let’s not forget about the thing that attracted me to this pattern in the first place, the back vent.
In my sewing journey, I’ve regularly made things that look cooler than I feel. Things that I’d never end up buying in the store because I’d try them on and feel like they didn’t suit me. But when I sew them, I own them before I ever get to try them on. So I could either give them up to someone they would suit better, or wear them, and love them because my hands and mind made them, and become someone who dresses this way. It happened with wide leg jeans. It happened with loose fit elastic waisted pants. It happened again with my beautiful Isla trench coat and my double breasted, belted coat that was a toile for my Rumana. With each of these projects I’ve gained more confidence, both in my sewing and my style. I know I will come to feel that this jacket is “me”. It will take a bit of time but soon my pride in making it will extend to pride in wearing it and then it will happen. This will be my style. This is the transformative power of clothing and of making your own clothes and I am here for it.
Thanks for coming on this journey with me.
~ Lindsay