UPDATE (January 22, 2021) – It looks like the Sugardale site is back and this pattern is available again. Thank you Gina for letting me know in the comments!
I’m not sure how I found Sugardale on Instagram, but sometime in April I stumbled across Trista’s feed and was instantly hooked on the Len Coveralls. I was coming off my Intrepid Boiler Suit and was looking to try something more fitted and then there it was, the pattern I didn’t know I was looking for. It immediately jumped to the top of my queue and I purchased the pattern, printed it and ordered the fabric (9 oz. brushed bull denim from Blackbird Fabrics in the colour Teak – still available at the time of this post), within 24 hours.
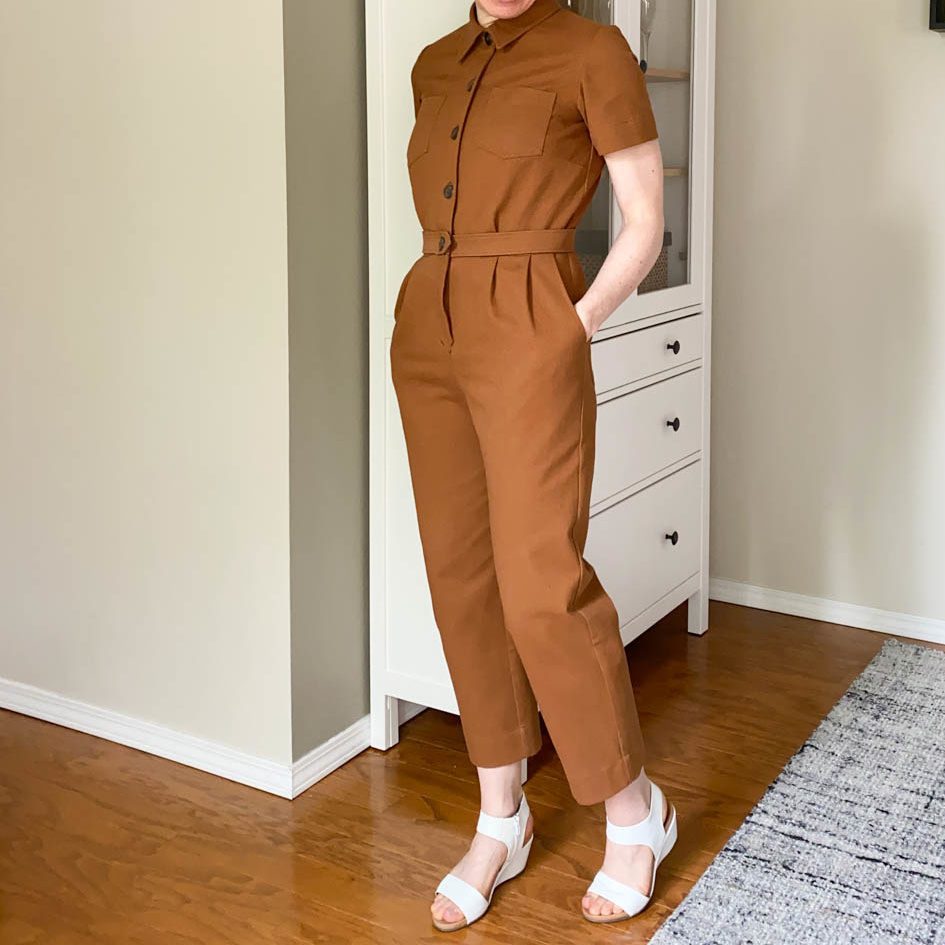
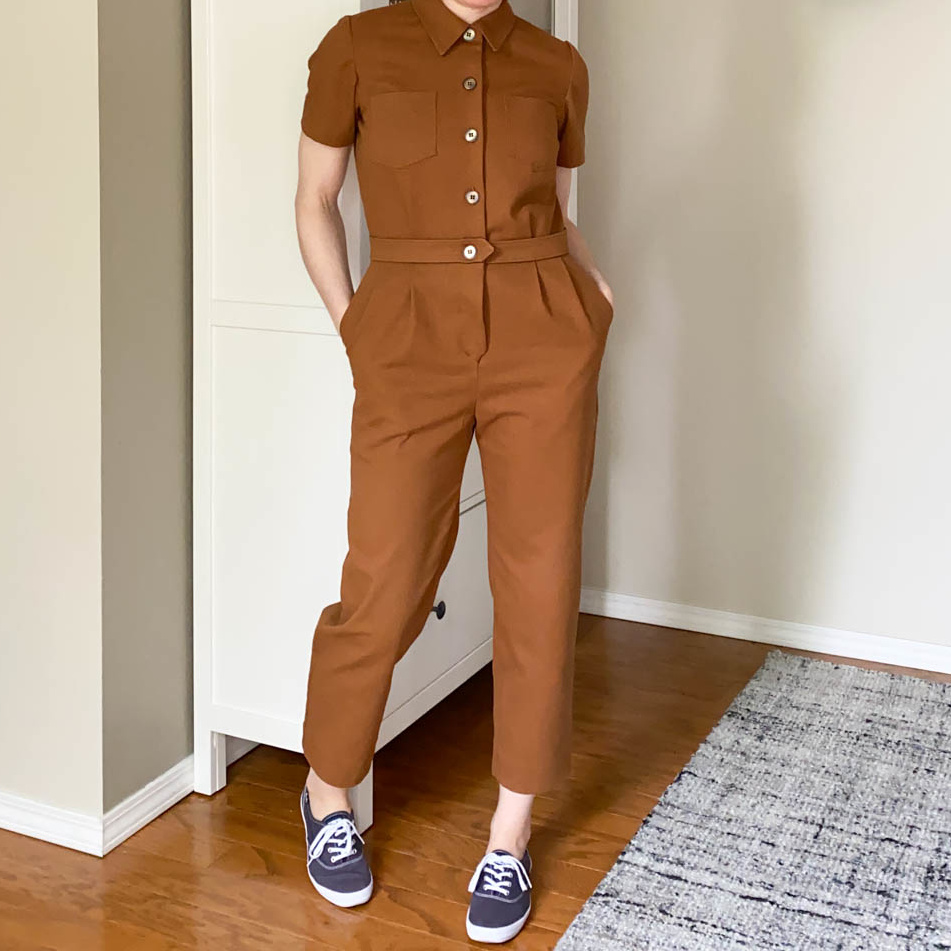
Before I get into my notes, I just need to say that I’m thrilled with how this turned out and I’m glad I dove into this project. The bull denim is buttery soft and also durable (which is good because of all the seam ripping I had to do). The pattern pairs with the fabric really well and the pattern itself is just so unique. This is already a standout in my wardrobe and I can’t wait until I have more opportunities to wear it out and about post-pandemic. But this project wasn’t without numerous challenges for me.
I went into this make knowing full well that that it was not drafted for my frame and knew I’d have to make a lot of adjustments, but I did not anticipate the challenge that it would end up being. Here is the sizing and list of the mods I made:
- Size 0 pants, size 4 front bodice, size 6 back bodice, size 8 belt (me currently B34/W28/H35)
- Took 5cm from the front and back rise, below the fly front
- Recurved the front crotch curve using my pants block as a guide (something I always do on pants since I developed my block last fall)
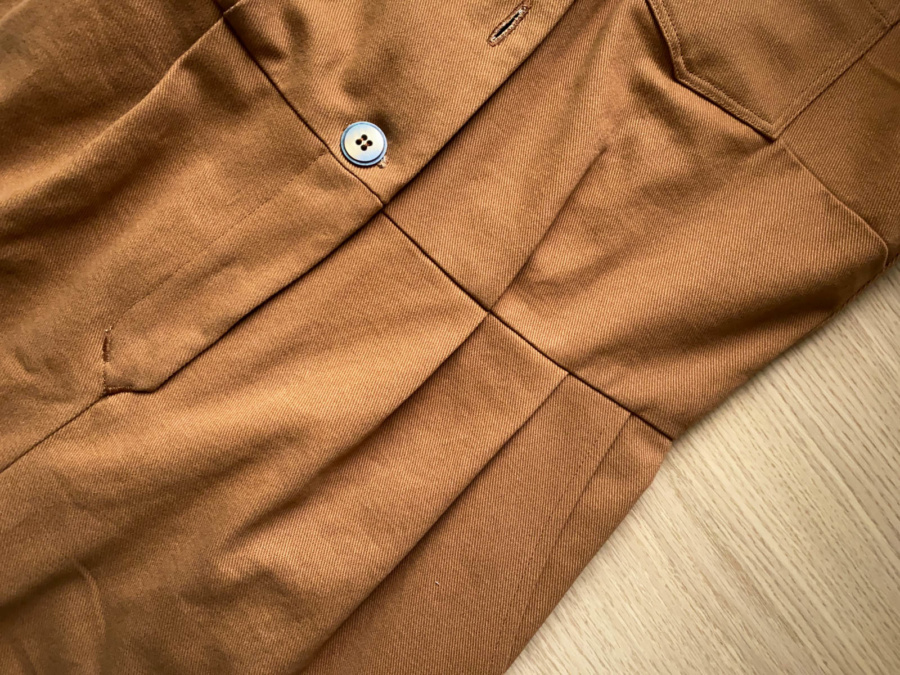
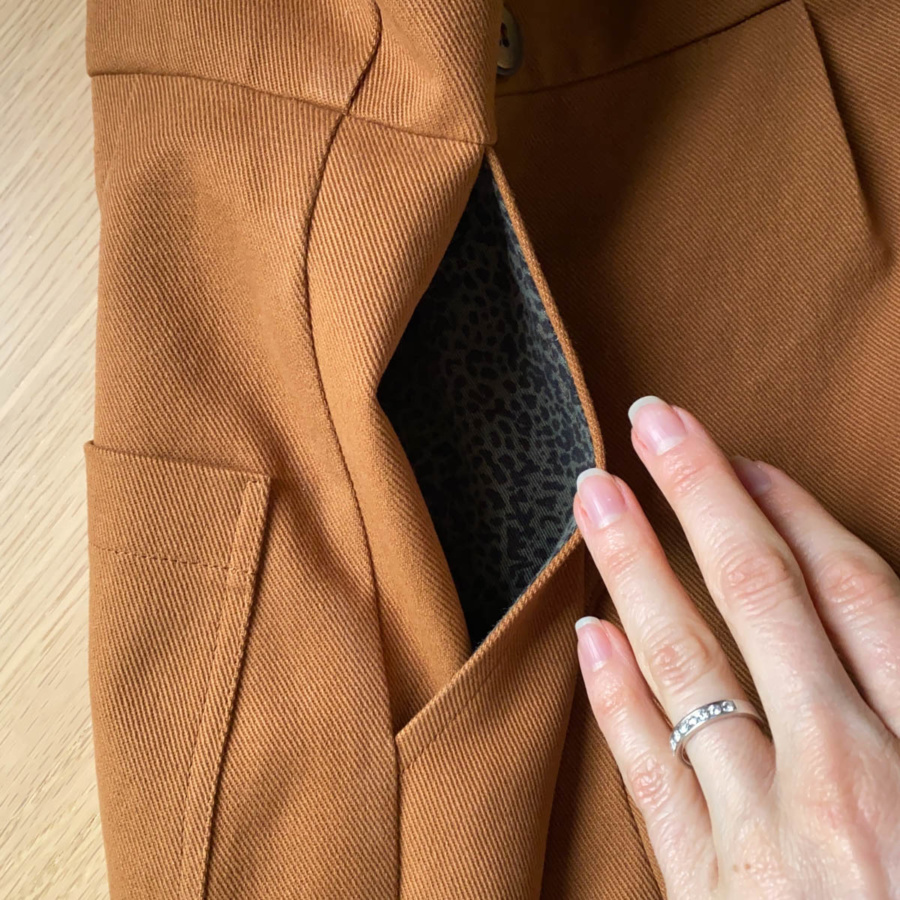
- Reduced the length of the fly front by one inch and raised the side pocket openings by an inch
- Extended the seam allowance of the bodice and pants pieces to 1 inch before cutting out my fabric (to give me more room for fitting)
- Started with the size 4 “action back” but had to recut when it ended up too small and wouldn’t match up the front pieces (more on that below)
- Started with the size 6 belt but had to recut in a size 8
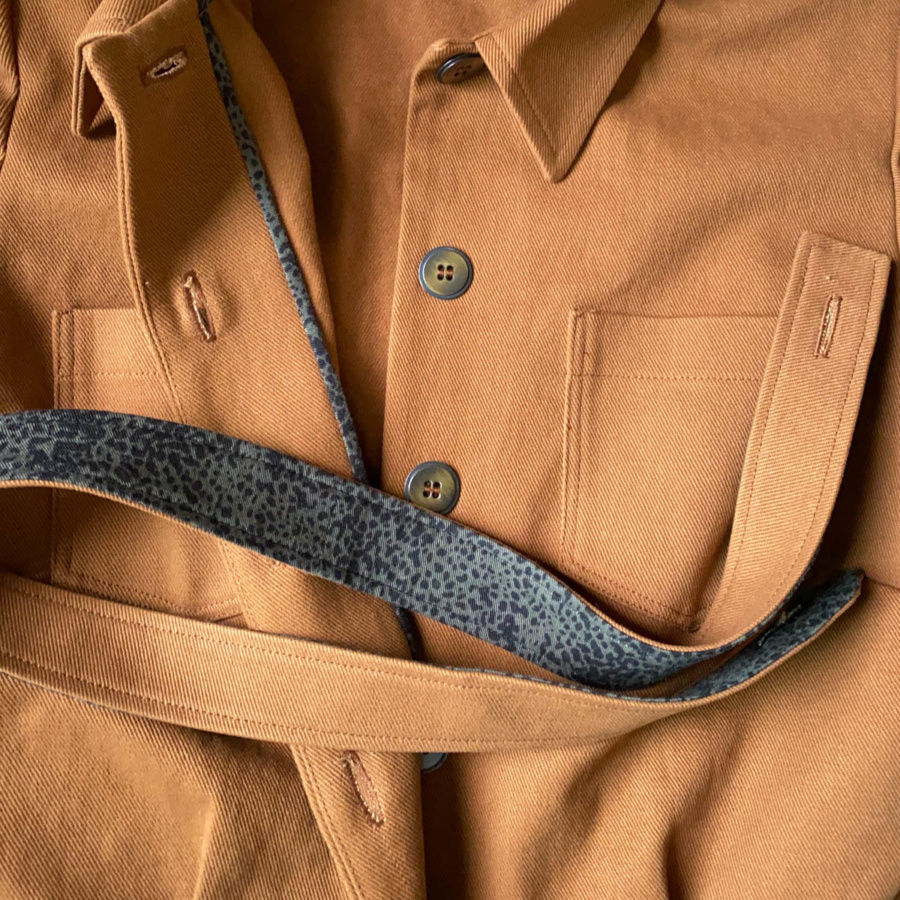
- Made the belt reversible when I recut it, partly because I ran out of fabric, partly to reduce the bulk and partly because I thought it would be fun
- Started with the sleeve as drafted but had to recut to shorten it (more on that below) and to give myself more room in the sleeve cap
- Increased the seam allowance on the outer leg seam by 1/2″ (to a total of 9/8″)
- Changed the construction order so the waist seam would be done closer to the end
- Bias bound the front facings
First let’s talk about the order of construction. As a rather short-waisted person, all pants are a challenge for me. Jumpsuits and coveralls take that challenge and multiply it by 100. I learned this lesson when I made my first jumpsuit last year and now know that I have to fit the top and bottom independently and attach them together near the end of construction if I want to avoid the crotch ending up somewhere near my knees. Yes, muslins WOULD help me with this problem. No, I do not plan on changing my ways and muslining everything I make. Instead, I’m learning how to mod patterns before I cut the fabric and I use construction order to help me fit.
Where this caused an issue for me was that I decided to bias bind the front facings and I wanted to bias bind them in one piece. But the facing have to be done before the collar can be finished and I needed the collar finished to properly assess the fit of the bodice before I could figure out the waist seam allowance I wanted to use. So I ended up half finishing the bias binding at the top of the facings and leaving a long tail of it hanging until I completed the waist seam and could attached it to the lower part of the facings. This was all my issue and not one with the pattern at all but it was an interesting challenge to overcome. I ended up being thankful I extended the waist seam allowances to 1 inch because I used some of this in fitting. I ended up taking the full inch at the front but tapered from the side seams to a seam allowance of only 1/2″ at the centre back.
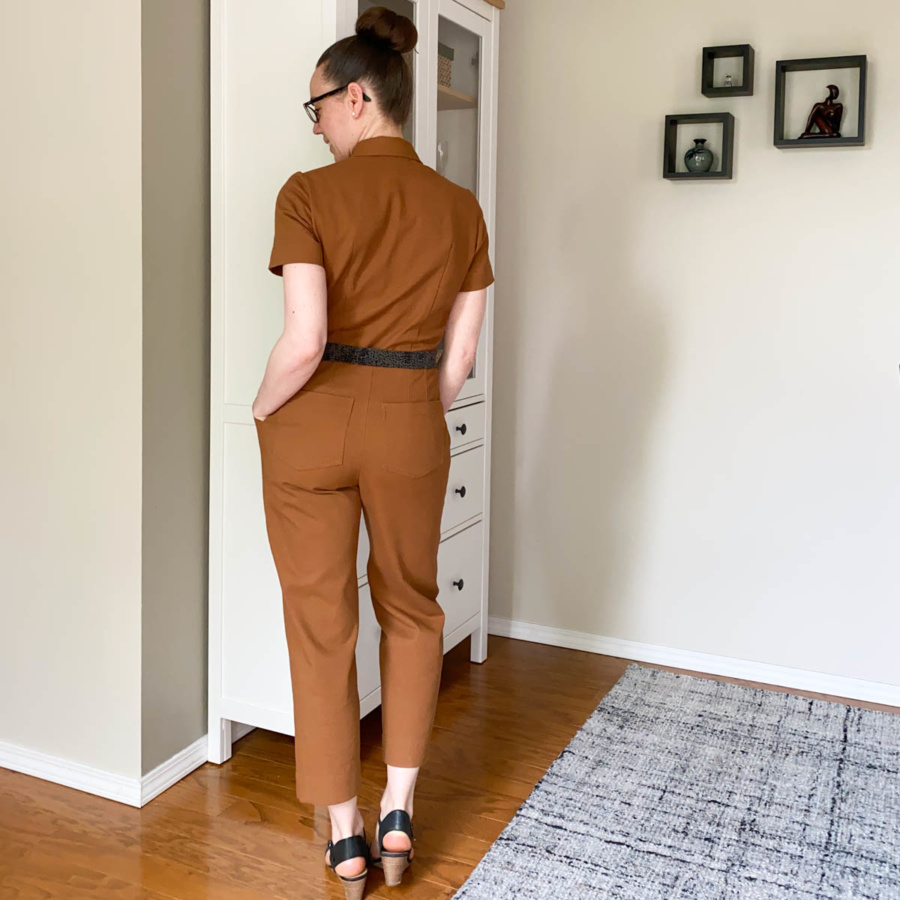
The waist seam isn’t the only part that is finished fairly early in construction. The sleeve and leg hems are also done really early. Both parts have hem shaping build in to the pattern, which makes for a cleaner fold up, but also makes it difficult to change the length after cutting the fabric if you decide you want to. I ended up wanting to shorten the sleeves but the way the pattern was cut to fold up nicely didn’t give me the fabric I needed to reduce the length. The first sleeves were also really tight across my shoulders even though the bodice fit correctly at the shoulders so I decided to recut them. I gave myself more room across and above the sleeve cap, shortened the sleeve and removed the turned up cuff. I kept the leg length as it was, which was actually 5cm shorter than drafted because of my pre-cutting crotch curve modifications.
I also left the construction of the front pleats until later and ignored the notches. I blended between a 4/6 top and size 0 bottoms without any grading. I just used the pleats. I fit the top first and then carefully made pleats on the bottoms that corresponded to the top. I’m pretty thrilled with how they worked out. On the back, I just eased the excess top fabric between the pleats so that everything lined up properly. This gives me a bit of blousing effect on the back of the top, which I don’t mind at all.
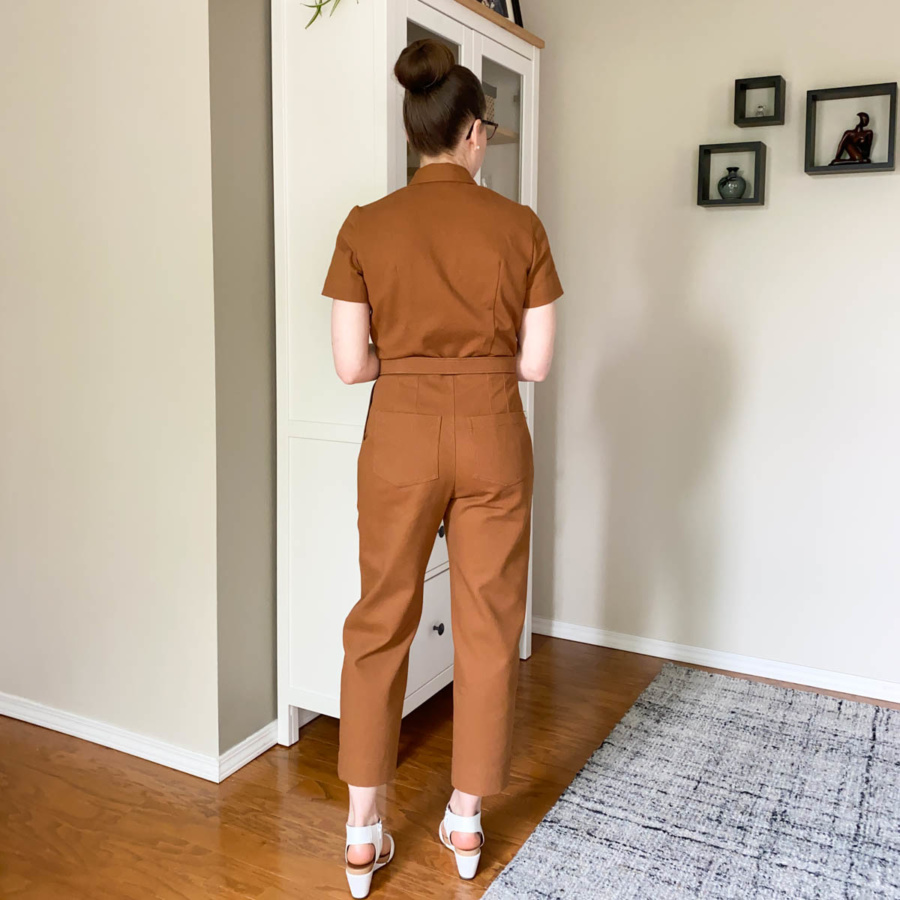
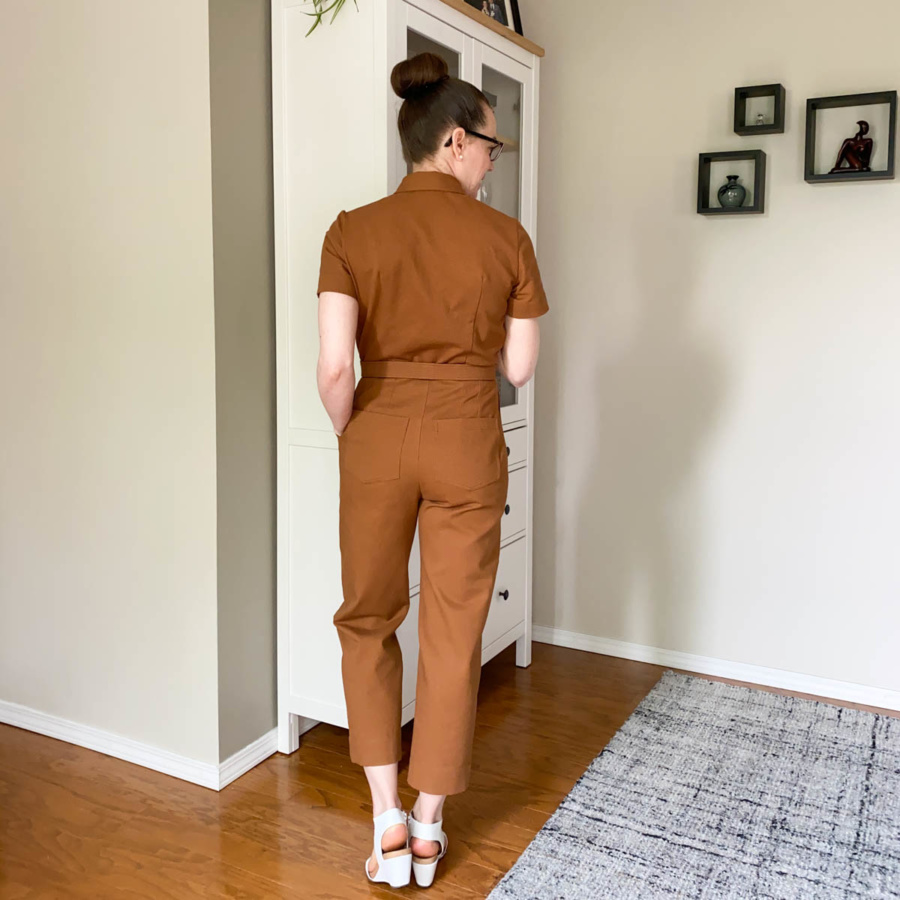
Speaking of the back, it was the first issue I had with this make. I cut the size 4 “action back” and sewed it up with the 1/4″ seam allowance as instructed in the pattern but the shoulder edge ended up about an inch shorter than the front shoulder edge. There was no way to get the two to match up. Because the “action back” is constructed with such small seam allowances, it also doesn’t give you any room for fitting. Luckily, I had enough fabric to recut the back. This time I went with the regular bodice back and cut a size 6, just to be safe. It ended up matching up with the size 4 front bodice perfectly and was fairly easy to ease in to fit the pants as described above.
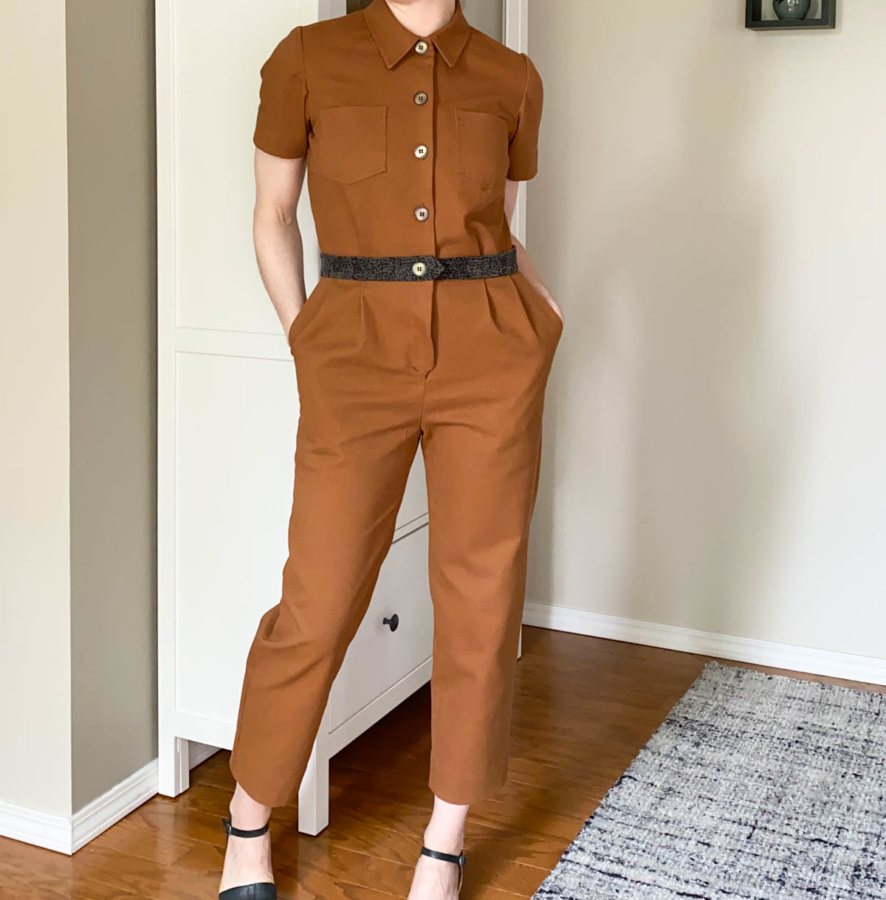
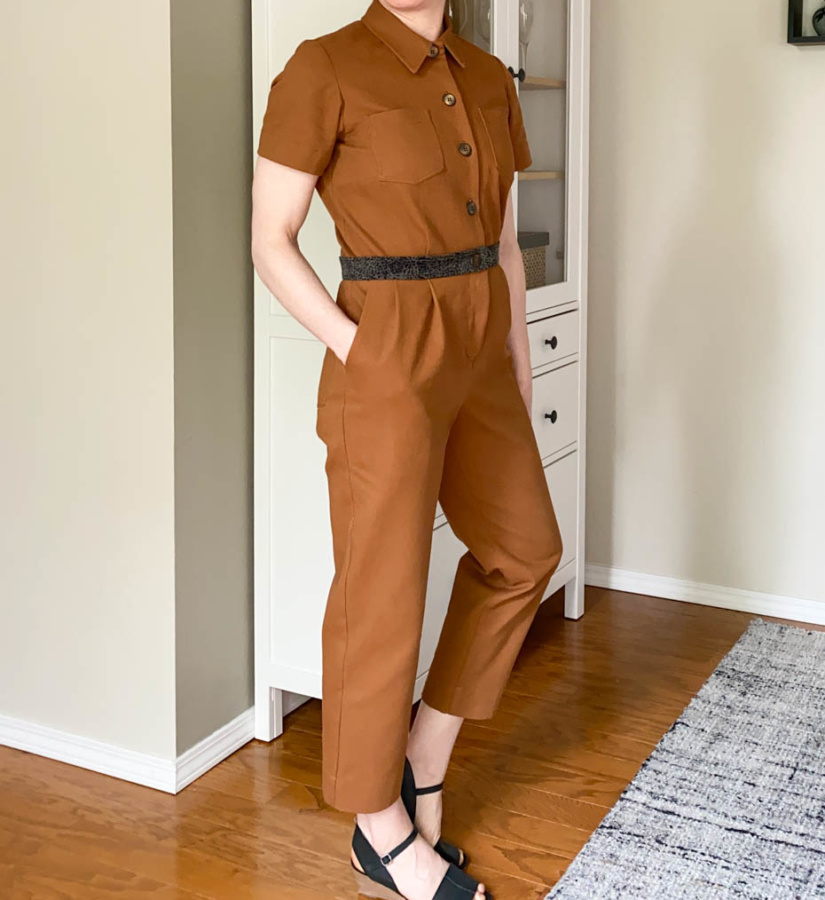
The last mod I made was to recut and lengthen the belt. I originally cut the size 6 according to my measurements but it ended up uncomfortably tight and also bulkier than I wanted. When I re-cut, I cut a size 8 and cut one side from my main fabric (with a seam at centre back because I was almost out of fabric my this point) and one side from my bias fabric (scrap Tencel twill from the lining of my original Kelly Anorak). I don’t know how often I’ll use the belt with my temperamental digestive system but it’s fun to have options. I also really like it with my Atelier Brunette scrap belt that I made for one of my bodice block dresses last summer.
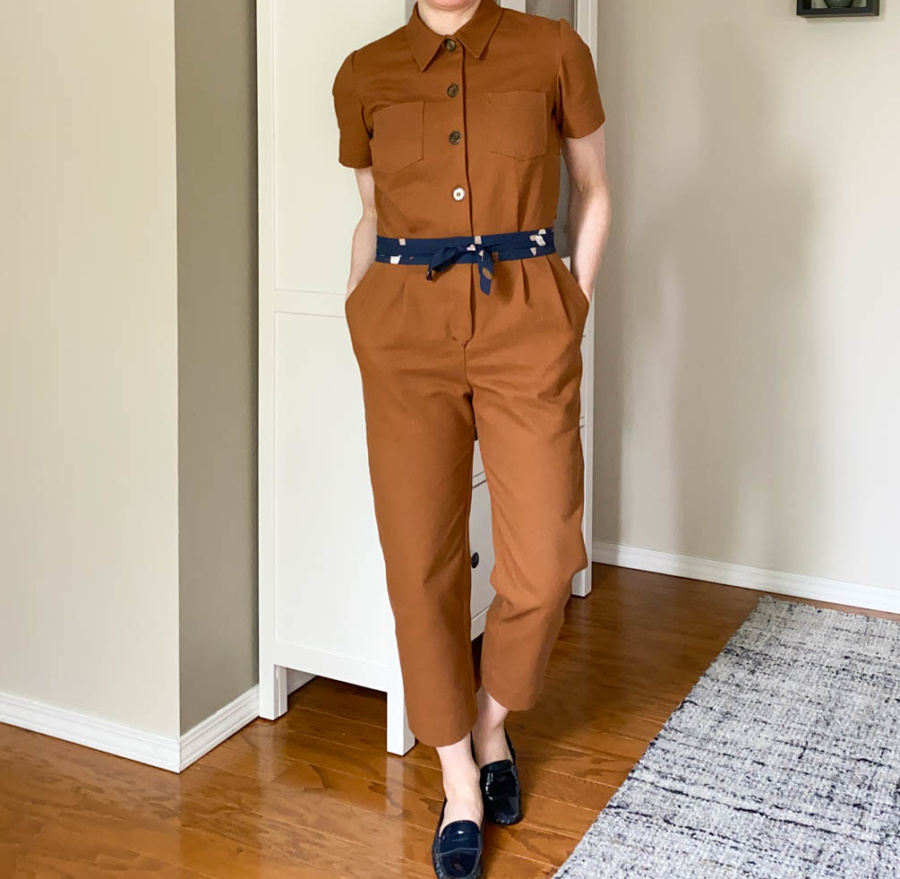
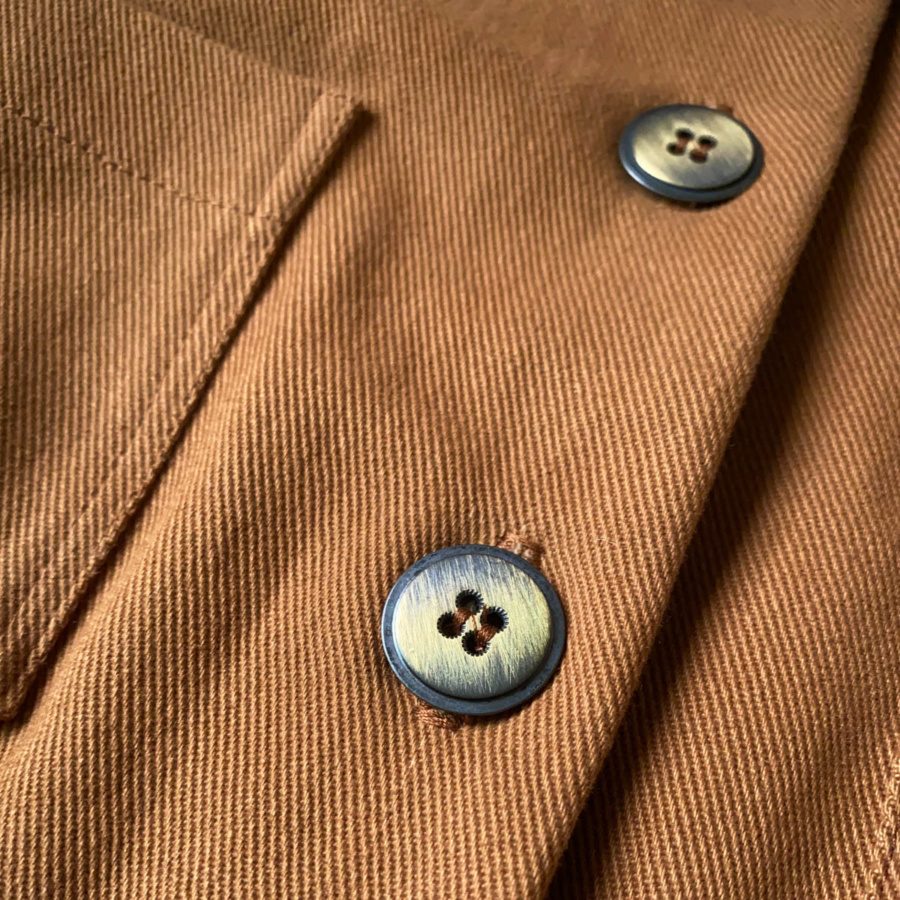
In the end, I’m so incredibly pleased with the fit I achieved on a pattern that was drafted for someone with much more going on below the waist than I have. Some other things about this make that I really like are the bias bound facings, the buttons (from Gala Fabrics) that are metal with a brushed finished and are absolutely perfect with the teak denim. The denim as well. I can’t stop touching it. It’s so incredibly soft and, as mentioned previously, really durable. I had to do a lot of seam ripping on this make and it held up very well through it all. I highly recommend this fabric for this pattern.
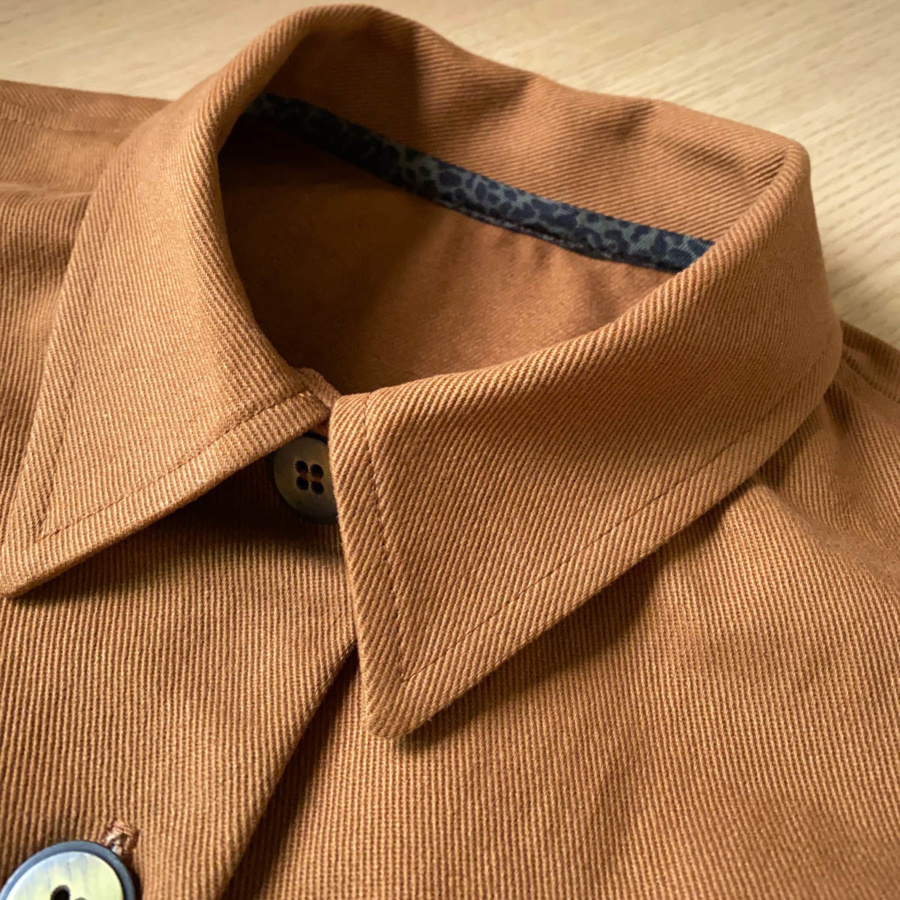
The belt is really fun and interesting. I’ll have to see how the button at the waist holds up over time but I love how unique the design is. The collar is the perfect shapes and I really like the bias finish on the inside. It’s what inspired me to bias bind the facings. The pockets are also great and the extra room at the hips makes them easily accessible. I also love the shape and size of the back pockets.


If you’re interested in trying this pattern, go for it. I recommend doing a muslin, or just do like I did and accidentally buy too much fabric so you have enough to recut the pieces that don’t work for you! Also, watch the seam allowances. Seam allowances in the pattern are either 5/8″ or 1/4″ and some that you think would be 5/8″ aren’t. If you want to do more fitting, I recommend pre-reading all the instruction and increasing the seam allowances of those areas before you cut your fabric. A fitted jumpsuit is a challenge for sure but I think the feeling you get when you accomplish it is well worth the effort.
Wow this is a long post. Thanks for stopping by!
~ Lindsay
May 3, 2020 at 10:52 am
Lindsay, This looks great! I have this on my to do list as well and appreciate your fit notes. One question, do you have any good resources for developing a pants block? I don’t like making muslins either and usually just remake my garments with adjustments, but that not always fun either! I love the details you always put into your projects: bound facings, lined pockets, and as always, perfect topstiching. Thanks for sharing!
May 3, 2020 at 12:19 pm
Hi Heather. Thank you! I did my pants block with Alexandra Morgan from In House Patterns. I did mine in person but she also has virtual courses I think.
May 3, 2020 at 4:36 pm
Thanks, Lindsay! I appreciate the info.
May 5, 2020 at 8:01 pm
Lindsay, these are beautiful – so neatly and carefully made and they look great on you! I’ve had the pattern and fabric for a while, even traced off my size AGES ago – your post has convinced me to get going! Thanks for being so detailed on everything you did. I have a hard time fitting anything (narrowed shouldered small waisted petite but big busted and hipped) but if you can make this many adjustments I can too!
Well done, hope you enjoy wearing your Lensn
May 10, 2020 at 7:29 pm
Hi Sam. Sorry I missed your comment. I’m glad if I’ve inspired you to give it a try. I was daunted when I started this project but I just took it step by step and it felt great to finish it and have it fit! Good luck and have fun with yours!
July 12, 2020 at 1:26 pm
Hi Lindsay, this jumpsuit looks amazing! Do you know where the pattern PDF is available for purchase? From the looks of it the sugardale website is no longer running. Thanks!
July 12, 2020 at 5:20 pm
That’s too bad, I didn’t realize that! I don’t know of anywhere else the pattern is available unfortunately :(
July 16, 2020 at 2:43 pm
Hi Lindsay, this looks incredible! I’ve been searching for the perfect jumpsuit and I am so disappointed to find that the pattern is not available. I do hope that it becomes available again soon.
July 16, 2020 at 7:49 pm
Thank you Katie. I hope it is available again too!
January 10, 2021 at 10:20 am
Hi and Happy New Year!
sugardale.net is back up and patterns are available again.
January 18, 2021 at 9:44 pm
That is good news! Thanks Gina :)